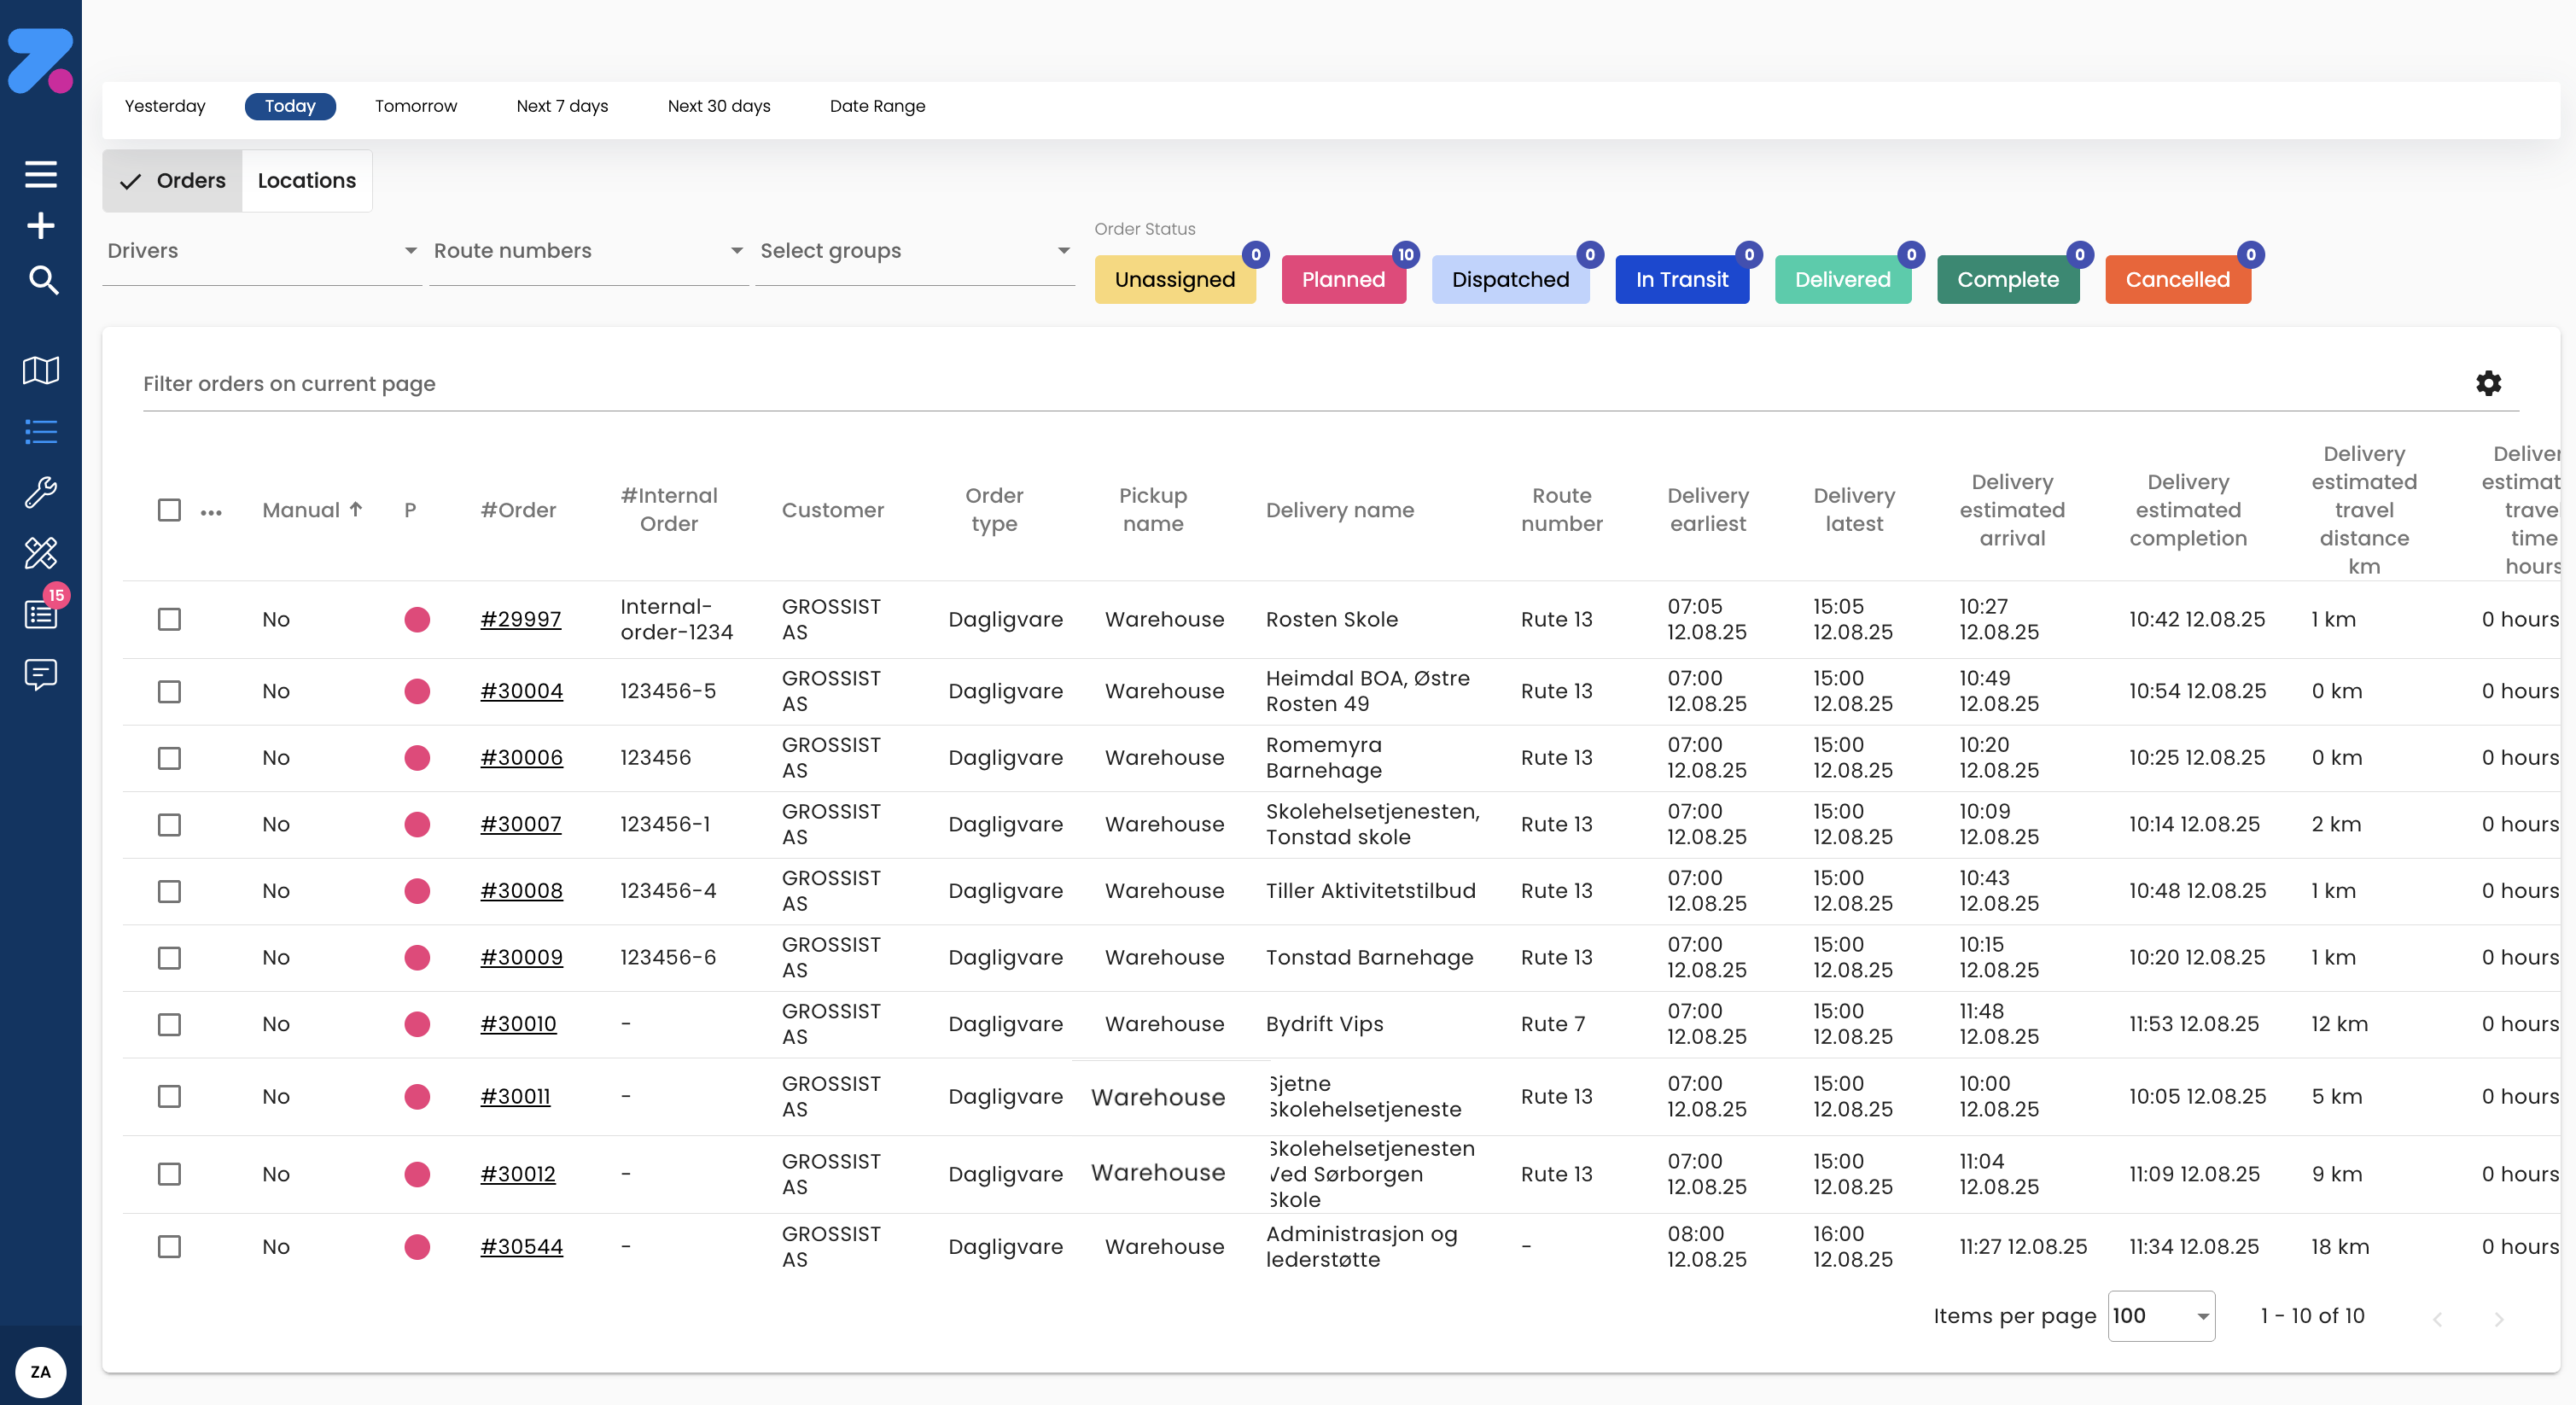
Order Control
Order Control is the table view where all the orders live — past, present, and future. Use it to find a specific order, change its status, edit its details, attach documents, or update many at once.
Where Order Overview is “what’s happening right now”, Order Control is “show me everything”.
How to open Order Control
Click Order Control in the left sidebar (the icon with three dots and horizontal lines), or go to https://app.zenderatms.com/orders.
Page layout
- Date range tabs along the very top — Yesterday, Today, Tomorrow, Next 7 days, Next 30 days, Date Range (custom range).
- Orders / Locations tabs — switch between an order-centred view and a location-centred view.
- Order Status pill buttons (top right) — one coloured button per status with a count badge. Click a button to toggle that status into or out of the filter. Buttons that are showing colour are currently included in the table results.
- Filter dropdowns above the table — Drivers, Route numbers, Select groups.
- Filter orders on current page search box — quick text search across the rows currently loaded.
- Cogwheel icon (top right of the table) — opens the column editor.
- Table with one row per order and a kebab (⋮) menu per row for quick actions.
- Pagination at the bottom — change rows per page, step through pages.
Order statuses, in plain English
| Status | What it means |
|---|---|
| Draft | Created from a partial import or saved manually. Not a real order yet — has to be completed before it can be planned. See Draft Orders. |
| New | A real order, not yet assigned to a driver. |
| Assigned | Locked to a driver but not yet dispatched. |
| Dispatched | Sent to the driver’s mobile app. |
| In progress | Driver has started the day. Stops are picking up / arriving / completing. |
| Complete | All stops finished. Ready for invoicing. |
| Cancelled | Manually cancelled. Won’t be planned or invoiced. |
Some fields are only editable in certain statuses (e.g. once a stop is Arrived or In transit, you can’t change its time window). The app hides or disables controls that aren’t allowed.
How to filter and search
From the top of the list:
- Date range tabs — Yesterday, Today, Tomorrow, Next 7 days, Next 30 days, Date Range. Click one to scope the table; pick Date Range to choose a custom from/to.
- Order Status pill buttons (top right) — Unassigned, Planned, Dispatched, In Transit, Delivered, Complete, Cancelled. Each shows a count of orders in that status. Click a button to toggle that status in or out of the filter. A button showing colour means that status is currently included.
- Drivers / Route numbers / Select groups dropdowns — restrict the table by driver, route number, or a group.
- Filter orders on current page search box — free-text search across the rows currently loaded (customer name, internal order number, reference, pickup/delivery names, etc.).
How to customize the table columns
Click the cogwheel icon at the top right of the table to open the column editor. From there you can:
- Show or hide columns — tick or untick the ones you care about.
- Rearrange columns — drag them into the order that suits how you work.
Your preferences are saved for your user, so the table looks the same next time you open Order Control.

How to read the Loading / Unloading / Incomplete columns
These three columns show the product status on the order — i.e. how far along the order’s individual products are in the loading and unloading process:
- Loading — a coloured progress bar showing how many of the order’s products have been loaded at pickup.
- Unloading — a coloured progress bar showing how many of the order’s products have been unloaded at delivery.
- Incomplete — a short badge describing the product status when it isn’t fully done (e.g. All loaded, cross dock, Bur 1/4, Palle).
A full green bar means every product on the order is loaded (or unloaded). A partial bar means only some of the products are done — read the Incomplete badge to see which/how much is left.
How to edit an order
There are two edit modes:
- Quick Update — click the ⋮ (three dots) at the end of a row to open the Quick Update dialog. Best for fast tweaks.
- Full edit — open the order and click the pencil icon in the header. Opens the full edit dialog.
Save with Save, or back out with Cancel.
The Quick Update dialog (row ⋮ menu)
The per-row ⋮ menu opens a Quick Update dialog grouped into three blocks:
Order Configuration
- Edit Order Type — change the order type.
- Edit Vehicle Type — change the required vehicle type.
- Change Order Priority — bump the order up or down.
- Edit Route Skills — change the skills the route needs.
Order Assignment
- Set as Unassigned — remove the order from its current driver / route.
- Set to manual — switch the order out of auto-planning so it stays where you put it.
Other Actions
- Go to details — open the full order page.
- Cancel Order — cancel the order (red text — destructive).
Time-window changes can affect bookings. If your order is booked on a route-scheduling interval, changing the pickup or delivery window may invalidate the booking. The app shows a warning when this happens — read it before saving.
How to manage products on an order
- Open the order.
- Scroll to the Products card.
- Click Add product, or click the ⋮ on a product row to Edit, Split, or Delete.
Split a product is useful when only part of a product line should move to a new order:
- Click ⋮ → Split.
- Choose Mode: split the quantity (keep both, give the new one a new internal order number) or copy.
- Enter the new internal order number.
- Confirm.
If your organization has the atoms feature enabled, you can group products into a hierarchy (parent + child packages) — drag children under a parent.
How to assign and dispatch an order
In normal use, Zendera’s optimizer assigns the order to a driver automatically as soon as it’s created — you don’t have to do anything. The order shows up on the right driver’s row in Order Overview, ready to dispatch.
You can override the auto-assignment in two ways:
- From the order detail page — click Assign to driver in the header, pick a specific driver, click Save. This locks the order to that driver. Then click Dispatch to send it to the driver app.
- From Tune routes — review the optimizer’s plan, drag stops between drivers, lock anything you don’t want re-shuffled, then click Dispatch all.
How to change an order’s status
Use the status buttons in the order header:
- Assign / Re-assign — set or change the driver.
- Dispatch — send to the driver app.
- Mark complete — usually done by the driver in the mobile app, but admins can do it manually.
- Cancel — cancels the order.
Status transitions are state-dependent. If a button is greyed out, it’s because the current status doesn’t allow it (e.g. you can’t dispatch a Cancelled order — you’d need to revive it first).
How to attach documents (waybills, photos, signatures)
- Open the order.
- Scroll to the Documents card.
- Click Upload and choose a PDF, image, or other file (typically up to 25 MB).
- The document attaches to the order and is visible to the driver in the mobile app.
Drivers also upload from the mobile app — proof-of-delivery photos and signatures show up here too.
How to view tracking and proof of delivery
- Open the order.
- The Tracking card has a public link you can share with the customer (e.g. in your booking confirmation email). It opens a public page with live status and an ETA.
- The Proof of delivery card shows the driver’s signature and any delivery photos once the order is complete.
How to cancel an order
- Open the order.
- Click Cancel (in the header status buttons).
- Confirm. Optionally enter a cancellation reason.
Cancelled orders stay in the system for reporting but won’t be planned, dispatched, or invoiced.
How to bulk-update many orders at once
The leftmost column has a checkbox on every row. Tick the boxes for the orders you want to act on, and then use Batch update to act on all of them at once.
- In the list, tick the checkbox on each order you want to change (or use the column header to select all).
- Click the ⋮ menu at the top → Batch update.
- The dialog shows Selected N objects to update. Click Add operation and pick from the list.
- Click Complete to apply, or Cancel to discard.
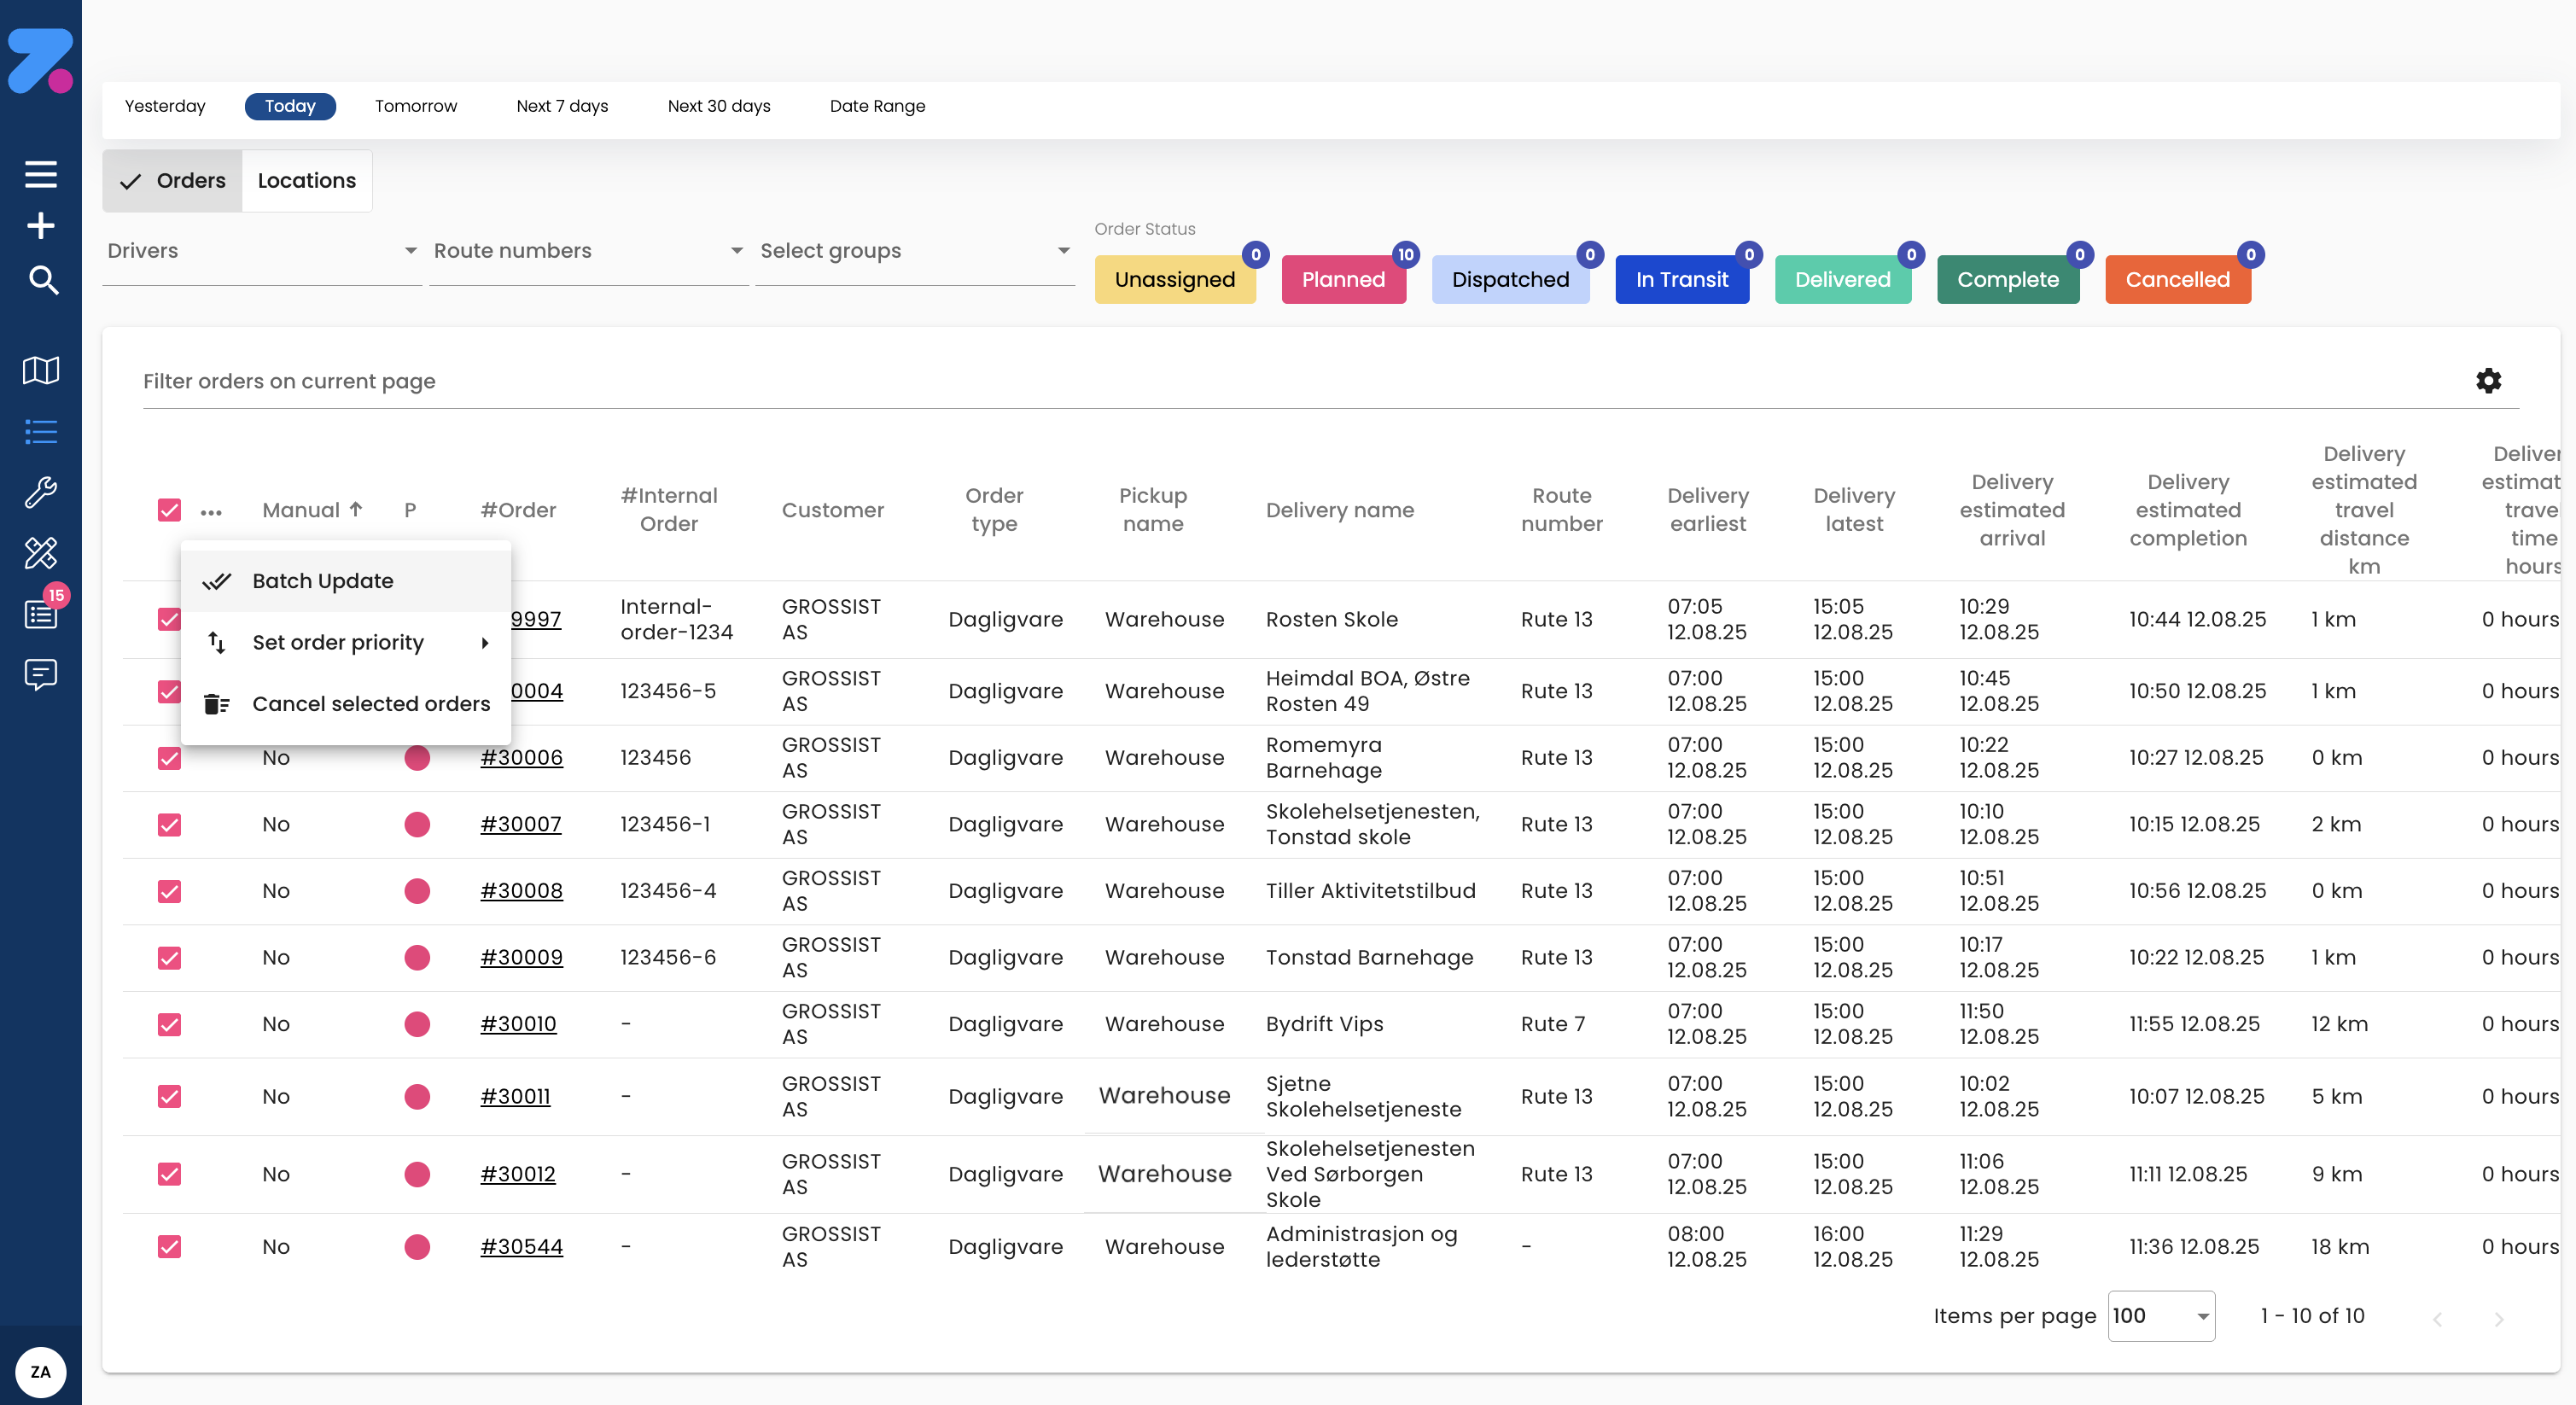

Operations available in Batch update
| Operation | What it does |
|---|---|
| Lock | Lock the selected orders to their current driver / position. |
| Unlock | Remove the lock so the optimizer can move them again. |
| Dispatch orders | Send the selected orders to the relevant driver apps. |
| Complete | Mark the selected orders as completed. |
| Cancel | Cancel the selected orders. |
| Unassign | Remove the driver assignment. |
| Edit Date | Move the orders to a different date. |
| Edit Skills | Change the skills required by the order. |
| Edit Route Skills | Change the skills required by the route. |
| Edit ETOL | Edit the estimated time on location (service time). |
| Edit Route | Change which route the orders are on. |
| Edit Warehouse Location | Set or change the warehouse location. |
| Remove sequence number | Clear any forced sequence number. |
| Set to Manual | Take the orders out of auto-planning so they stay where you put them. |
| Set to Auto | Hand the orders back to the optimizer. |
How to put an order on hold
If an order shouldn’t be planned right now (e.g. waiting for customer confirmation):
- Open the order.
- Click Put on hold in the header.
The order moves to Orders on hold in Order Overview and is ignored by the optimizer until released.
Advanced: Partner System Integration
Specialized Workflow
This section applies only to organizations using partner system export for order dispatch. Most dispatchers should use the standard dispatch workflow via Order Overview or Tune routes.
Order assignment for partner system export
For customers set up to export orders to partner systems, you’ll need to lock orders to drivers using the batch update functionality. This ensures orders are properly assigned before being dispatched to external systems.
Partner system requirements
Orders must be locked to drivers before they can be exported to partner systems. This workflow ensures proper driver allocation and prevents conflicts in external systems.
Step-by-step assignment workflow
Follow these steps to assign orders for partner system export:
1. Select orders for assignment
- Use the checkboxes on individual order rows to select the orders you want to assign.
- You can select multiple orders at once for batch assignment.
- Filter orders by date range or status to find the orders that need assignment.
2. Access batch update options
- After selecting orders, look for the ⋮ menu at the top of the Order Control page.
- Click on Batch Update to open the bulk action menu.
3. Lock orders to driver
- In the batch update menu, select the Lock action.
- Choose the appropriate driver from the dropdown list.
- This locks the selected orders to the specific driver and prevents reassignment.
4. Dispatch orders
- After locking orders to a driver, select the Dispatch orders action.
- Click Complete to finalize the dispatch process.
- Orders will now show as dispatched and ready for partner system export.
Best practices for partner system export
- Verify driver availability before locking orders to ensure successful completion.
- Group orders by geographic area when possible for efficient routing.
- Check time windows to ensure the assigned driver can meet delivery requirements.
- Monitor order status after dispatch to track progress in both Zendera and partner systems.
Order status after assignment
Once you complete the assignment workflow:
- Orders change from Planned to Assigned.
- After dispatch, orders become In Transit when the driver begins pickup.
- Partner systems will receive order data with confirmed driver assignments.
- You can track progress through both Zendera and your partner system interfaces.
Troubleshooting assignment issues
Orders won’t lock to driver:
- Check driver availability and capacity constraints.
- Verify the driver has the required skills for the order type.
- Ensure no conflicting time windows.
Batch update not working:
- Confirm you’ve selected orders using checkboxes.
- Check that all selected orders are in a valid status for assignment.
- Verify you have proper permissions for batch operations.
Common gotchas
- Edits restricted by status. When a stop is Arrived or In transit, you can no longer change its time window or location. Cancel and re-create if the change is critical.
- Duplicate internal order numbers reject the save. Each org has a unique-numbers space.
- Atoms hide/show. If your products have parent/child relationships, the children are hidden when the parent is collapsed. Click the expand triangle to see them.
- Frozen routes ignore the optimizer. If a route is frozen in Tune routes, the optimizer won’t add new stops to it.
What’s next
- To watch dispatched orders live, see Order Overview.
- To manually adjust the auto plan, see Tune routes.
- For incomplete orders waiting to be finished, see Draft Orders.