Order Overview
Order Overview is the live screen for watching today’s deliveries. It shows a Gantt chart of every active driver on the left, a map on the right, and three tabs across the top. A Gantt chart is a timeline view — one row per driver, with time running left to right and each stop shown as a coloured bar.
- Active orders — orders being delivered today.
- Orders on hold — orders not yet assigned to a driver. The number badge shows how many.
- Alerts — live alerts (e.g. “driver more than 30 min late”).
This is where dispatchers spend most of the day.
How to open Order Overview
Click Order Overview at the top of the left sidebar, or go to https://app.zenderatms.com/overview.
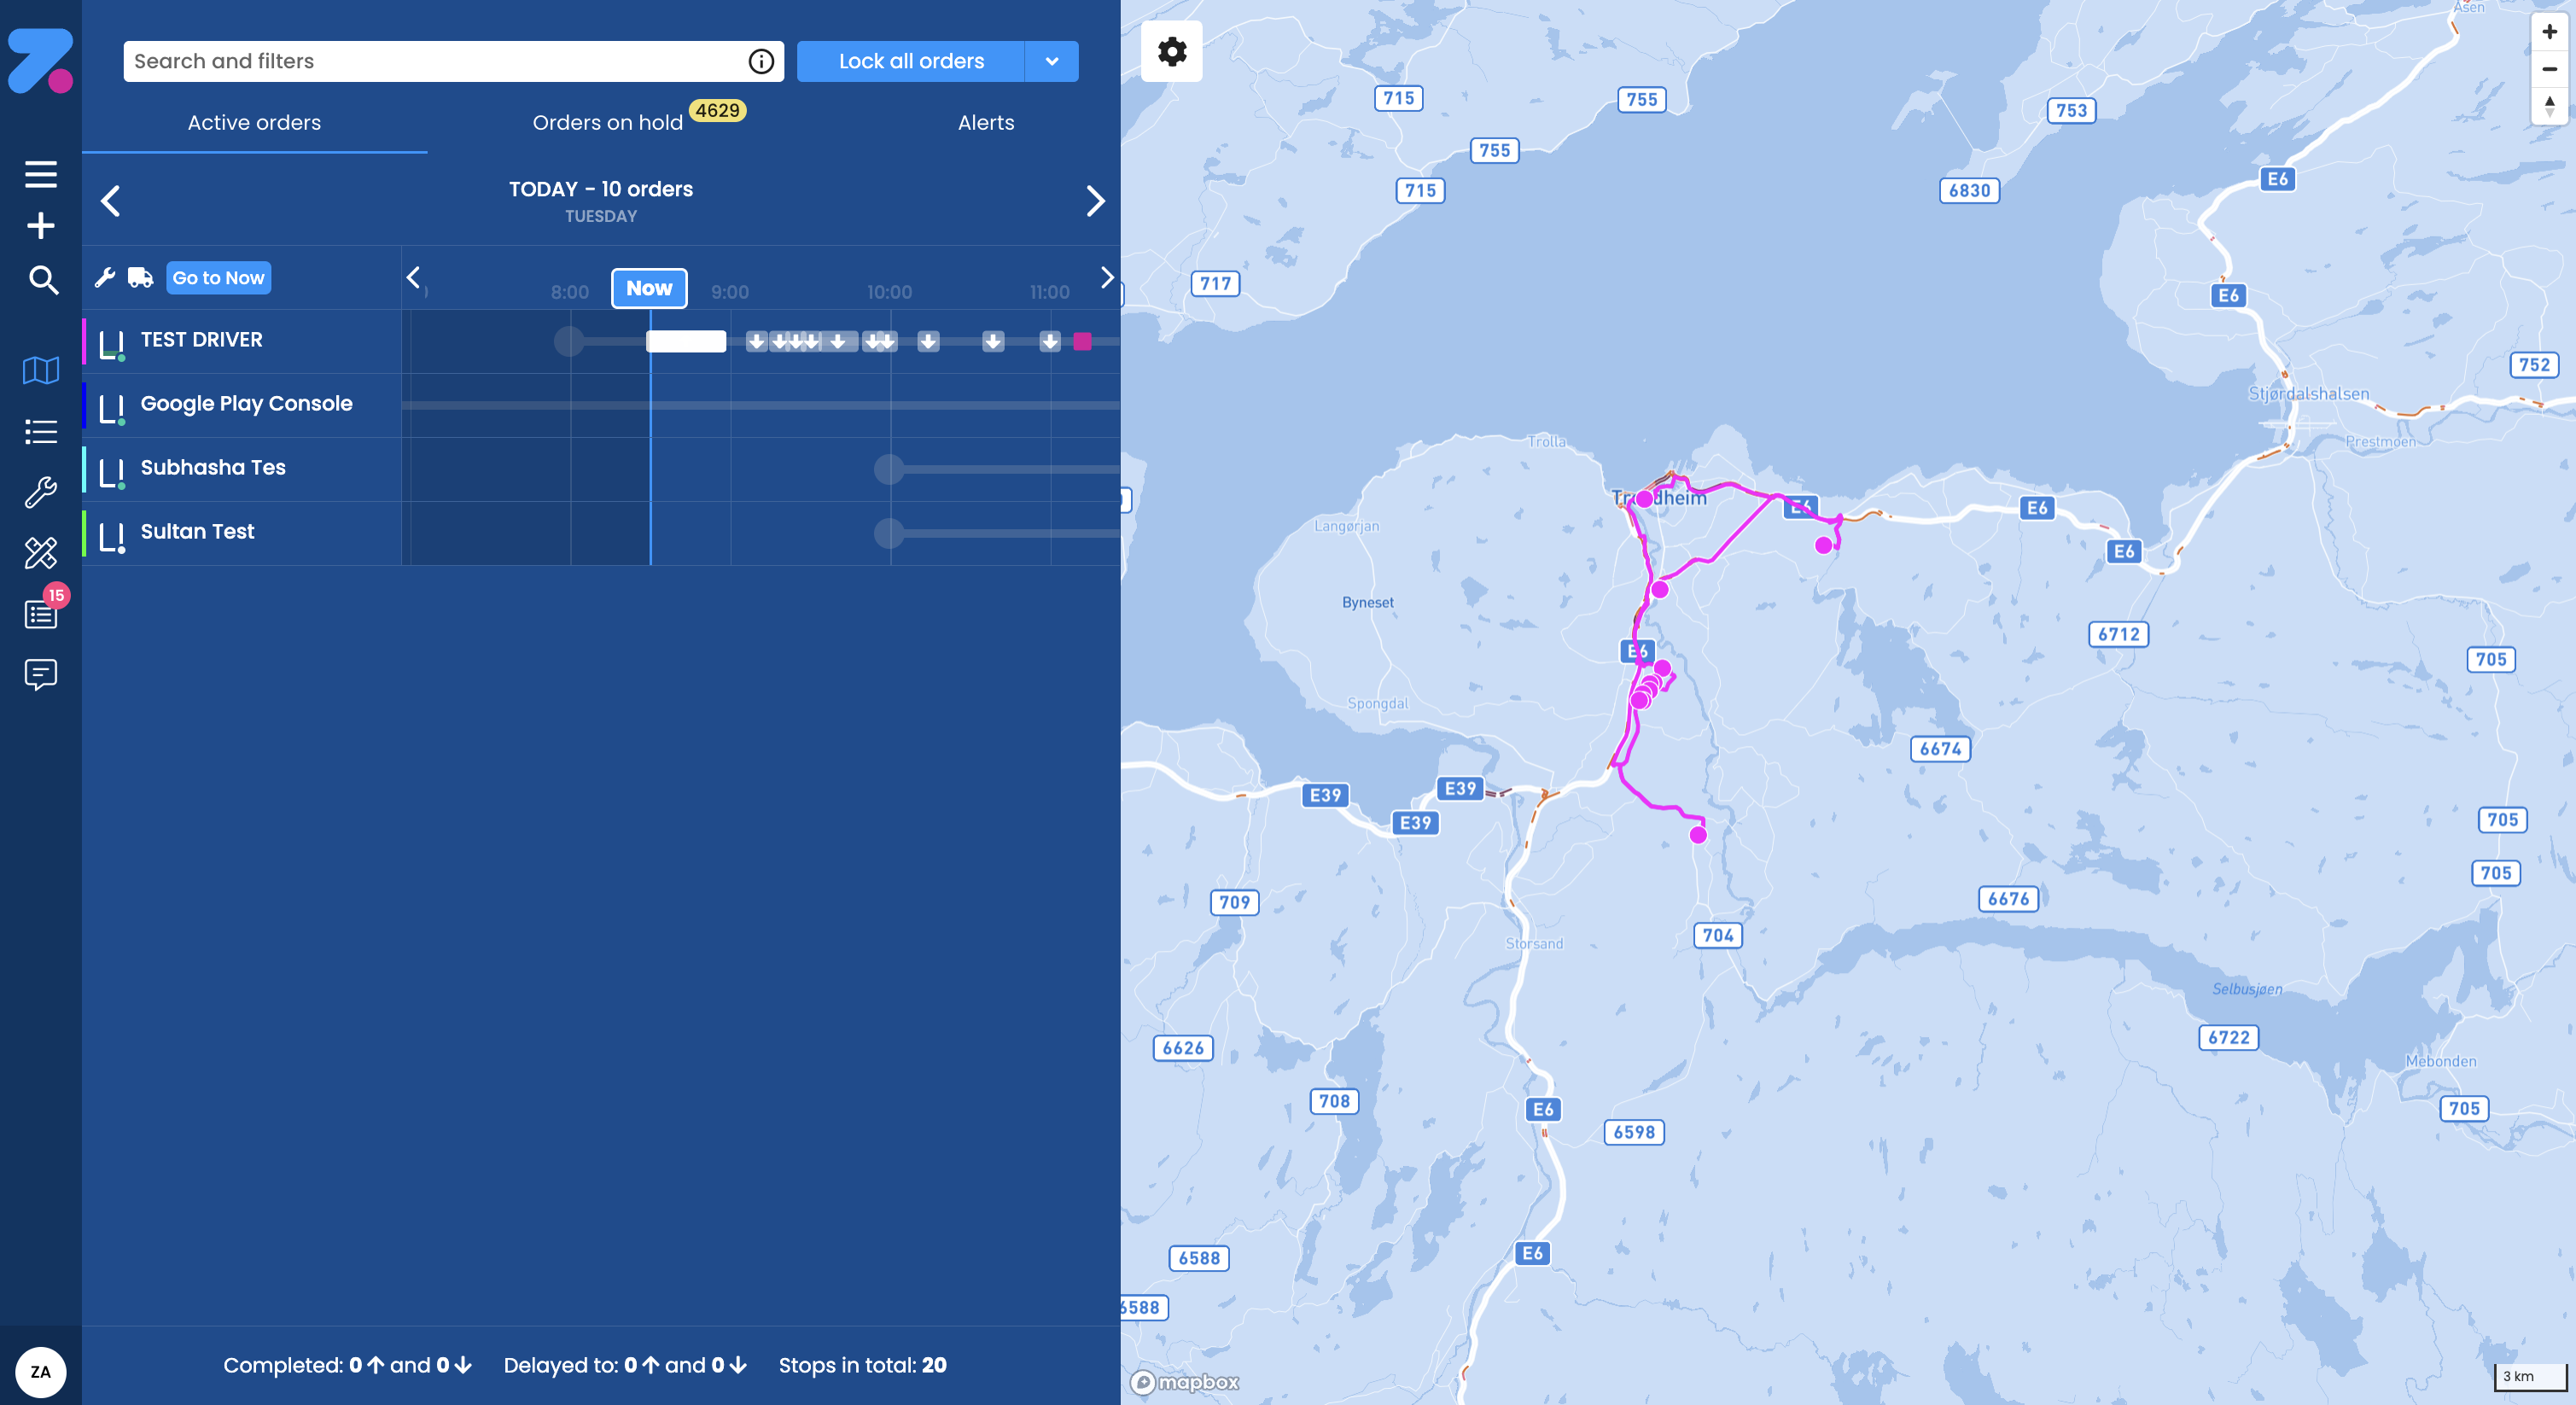
What you’ll see on the screen
The screen has three main areas:
| Area | What it does |
|---|---|
| Gantt chart (left) | A row per active driver who has a work shift and orders for the day, with hourly columns across the top and a coloured bar for each stop or route segment. |
| Map (right) | Live driver positions and route lines for the day. |
| Driver detail card (below the map, when a driver is selected) | Capacity bars (weight, volume, colli, ADR), plus quick stats. Colli is a Nordic term for items/parcels. ADR is the European standard for dangerous goods. The top-right corner of the card shows the number of pickups and deliveries on that work shift. |
You can drag the divider between the Gantt chart and the map to make either side bigger. Your width preference is remembered next time you open the screen.
Resize the Gantt chart. Click and drag on the right edge of the Gantt chart to resize it.
Toolbar icons above the Gantt chart
Just below the colour legend at the top of the Gantt chart you’ll find a small toolbar:
| Icon | What it does |
|---|---|
| Wrench | Opens the fine tuning section (Tune routes). |
| Vehicle | Opens the driver page. |
| Filter | Filter the rows shown in the Gantt chart. |
| Go to Now | Centres the Gantt chart on the current time. |
How to read the colour legend
Each stop on the Gantt chart is colour-coded by status:
| Colour | Status | Meaning |
|---|---|---|
| White / grey | Planned | Scheduled but not yet started. |
| Light grey | Assigned | Locked to a driver, not yet dispatched. |
| Blue | Arrived | Driver has arrived at the stop. |
| Half yellow | Early | Driver arrived earlier than the time window. |
| Half red | Late | Driver arrived (or is forecast to arrive) after the late time on the stop. |
| Green | Completed | Stop is done. |
| Orange/yellow bar | Break | Driver’s break time. |
The colour legend is shown across the top of the Gantt chart so you don’t have to memorise it.
Arrows on the bar. Each stop marker uses an arrow to show the direction of the goods:
- Arrow down (↓) — delivery.
- Arrow up (↑) — pickup.
Width of the box. The width of each stop’s box represents how much time is set to service that stop. Service time can either be a fixed time, or use Zendera’s built-in estimated time on location feature.
Why a stop can show Late but still get delivered. Time windows have a soft late time and a hard close time. The optimizer prefers not to be late, but if it can’t help it (e.g. traffic), it will still serve the stop and mark it Late on the timeline rather than dropping it. See How the system works.
How to navigate dates
- The header shows TODAY — 281 stops (or the date you’re viewing) with ‹ and › arrows. Click them to step one day back or forward.
- The Now line is the vertical bar showing the current time. The Go to Now button (top left of the Gantt chart) snaps the view back to it if you’ve scrolled away.
- The hour columns (8:00, 9:00, …) span the working day.
- Click and hold, then drag anywhere on the Gantt chart to pan the driver timelines forward or back in time.
How to read a driver row
Each row represents one driver’s day. Reading from left to right:
- Driver name with a coloured dot to the left — this dot is the online/offline indicator for the driver.
- Sub-line — the workshift hours and stop count, e.g. 04:00–17:00 · 9 stops.
- Timeline bar — the planned route, with stop markers shown as arrows (↓ for delivery, ↑ for pickup). Colour follows the legend above.
If a driver has more than one workshift in a day, you’ll see more than one bar on their row.
Hover to focus a route. Hover over a work shift bar or a driver’s name and that driver’s route will be focused on the map view.
How to use the tabs
Active orders
The default tab. Shows every driver who is working today and the timeline of their stops.
Orders on hold
Orders that exist but aren’t yet on a route. There are two reasons an order ends up here:
- Waiting — a recent order the optimizer hasn’t placed yet, or a stop a driver returned.
- Couldn’t be placed — the optimizer tried but couldn’t fit it anywhere. Common reasons: every vehicle of the required type is full, no driver on shift has the required skill, or the time window is too tight for any current route. Click an order to see the reason.
Drag an order from this tab onto a driver’s row in the timeline to assign it manually — useful when you know something the optimizer doesn’t (e.g. you’ll add an extra workshift later).
Alerts
Live alerts triggered by your alert rules (e.g. “Driver X is more than 30 min late on stop Y”). Click an alert to expand it. Use the inline buttons to acknowledge, snooze, or jump to the related order or driver.
How to dispatch the day’s plan
The Dispatch all button (top right) sends every assigned-but-not-yet-dispatched stop to the relevant driver’s mobile app.
- Click Dispatch all to send everything.
- Or use the dropdown next to it to dispatch only a subset (e.g. one driver, one route).
Dispatching is what makes a planned route appear in the driver’s mobile app. Until you dispatch, drivers don’t see the work.
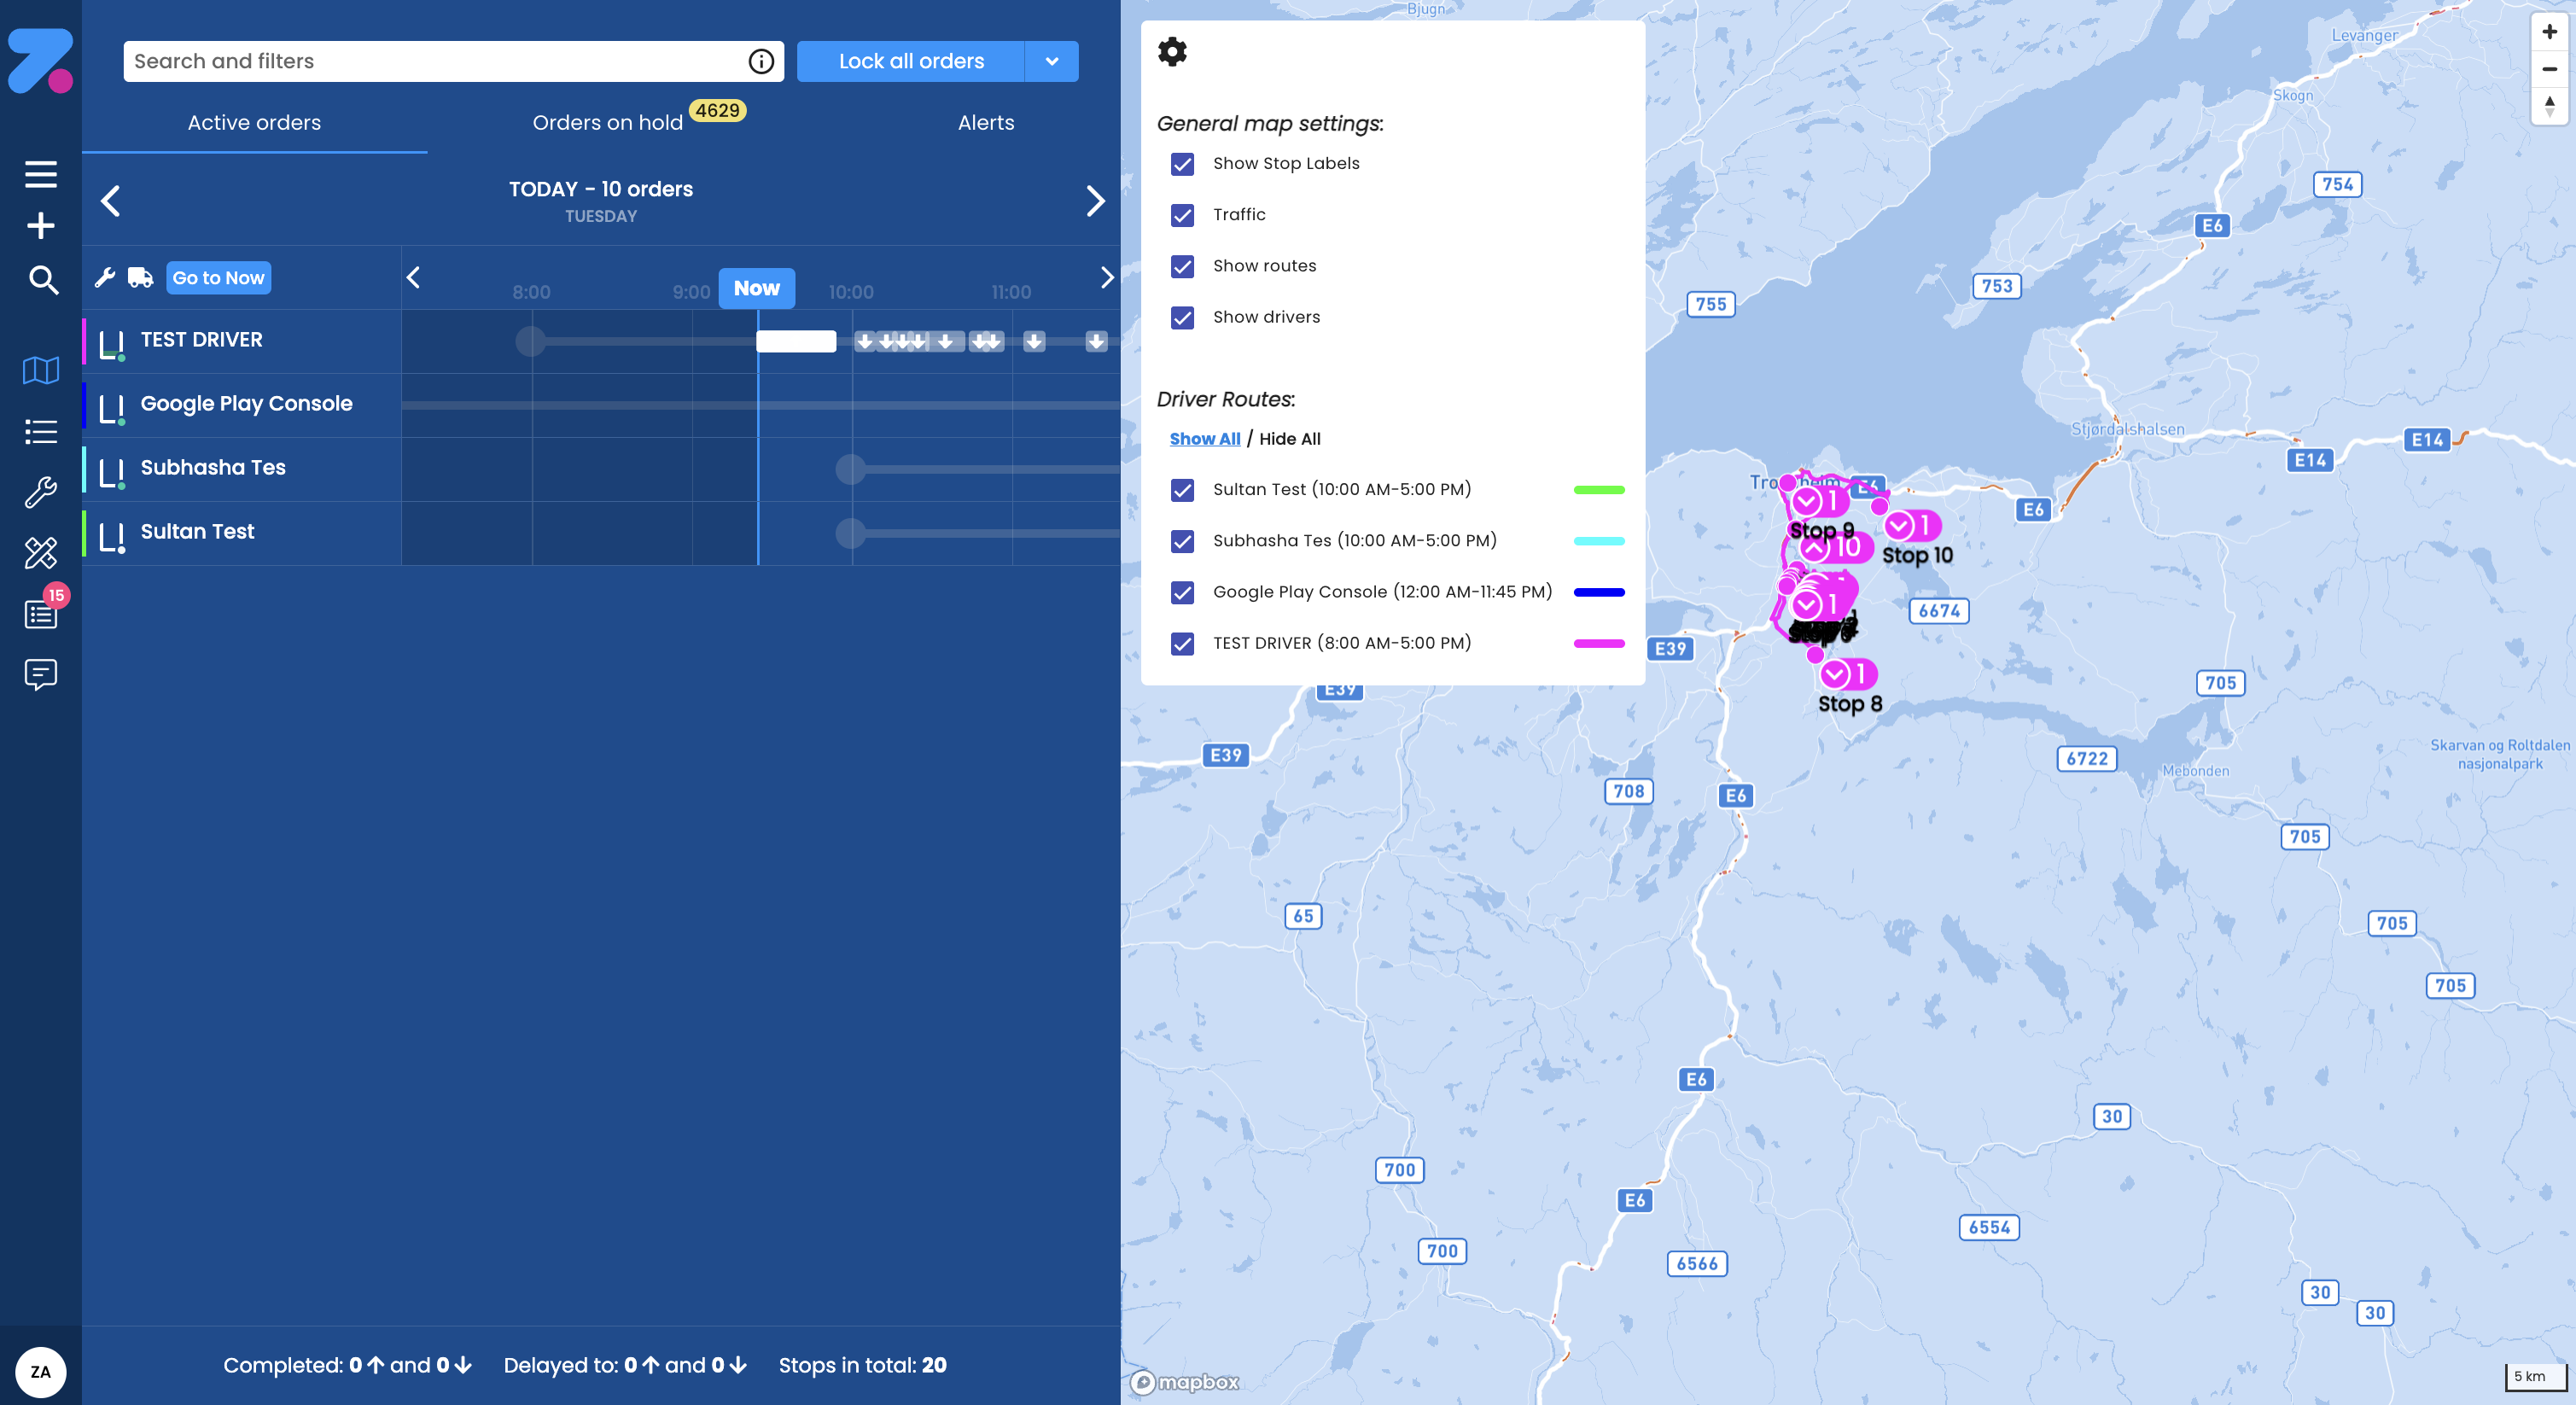
How to focus on one driver
Hover over a driver’s name or work shift bar to focus that driver’s route on the map. The detail card at the bottom of the map shows the driver’s capacity:
- Weight — used vs. vehicle limit.
- Volume — used vs. vehicle limit.
- Colli — number of items/parcels.
- ADR points — used vs. vehicle limit (for hazardous goods covered by the ADR standard).
- Vehicle ID, total stops, total orders.
- The top-right corner of the card shows pickup and delivery counts for the work shift.
Capacity bars turn red when the driver is over the vehicle’s limit. The optimizer normally keeps each route inside the limits, so a red bar usually means a manual override (locked stop, dragged-on order) has pushed the route past capacity. Reassign something to bring it back under.
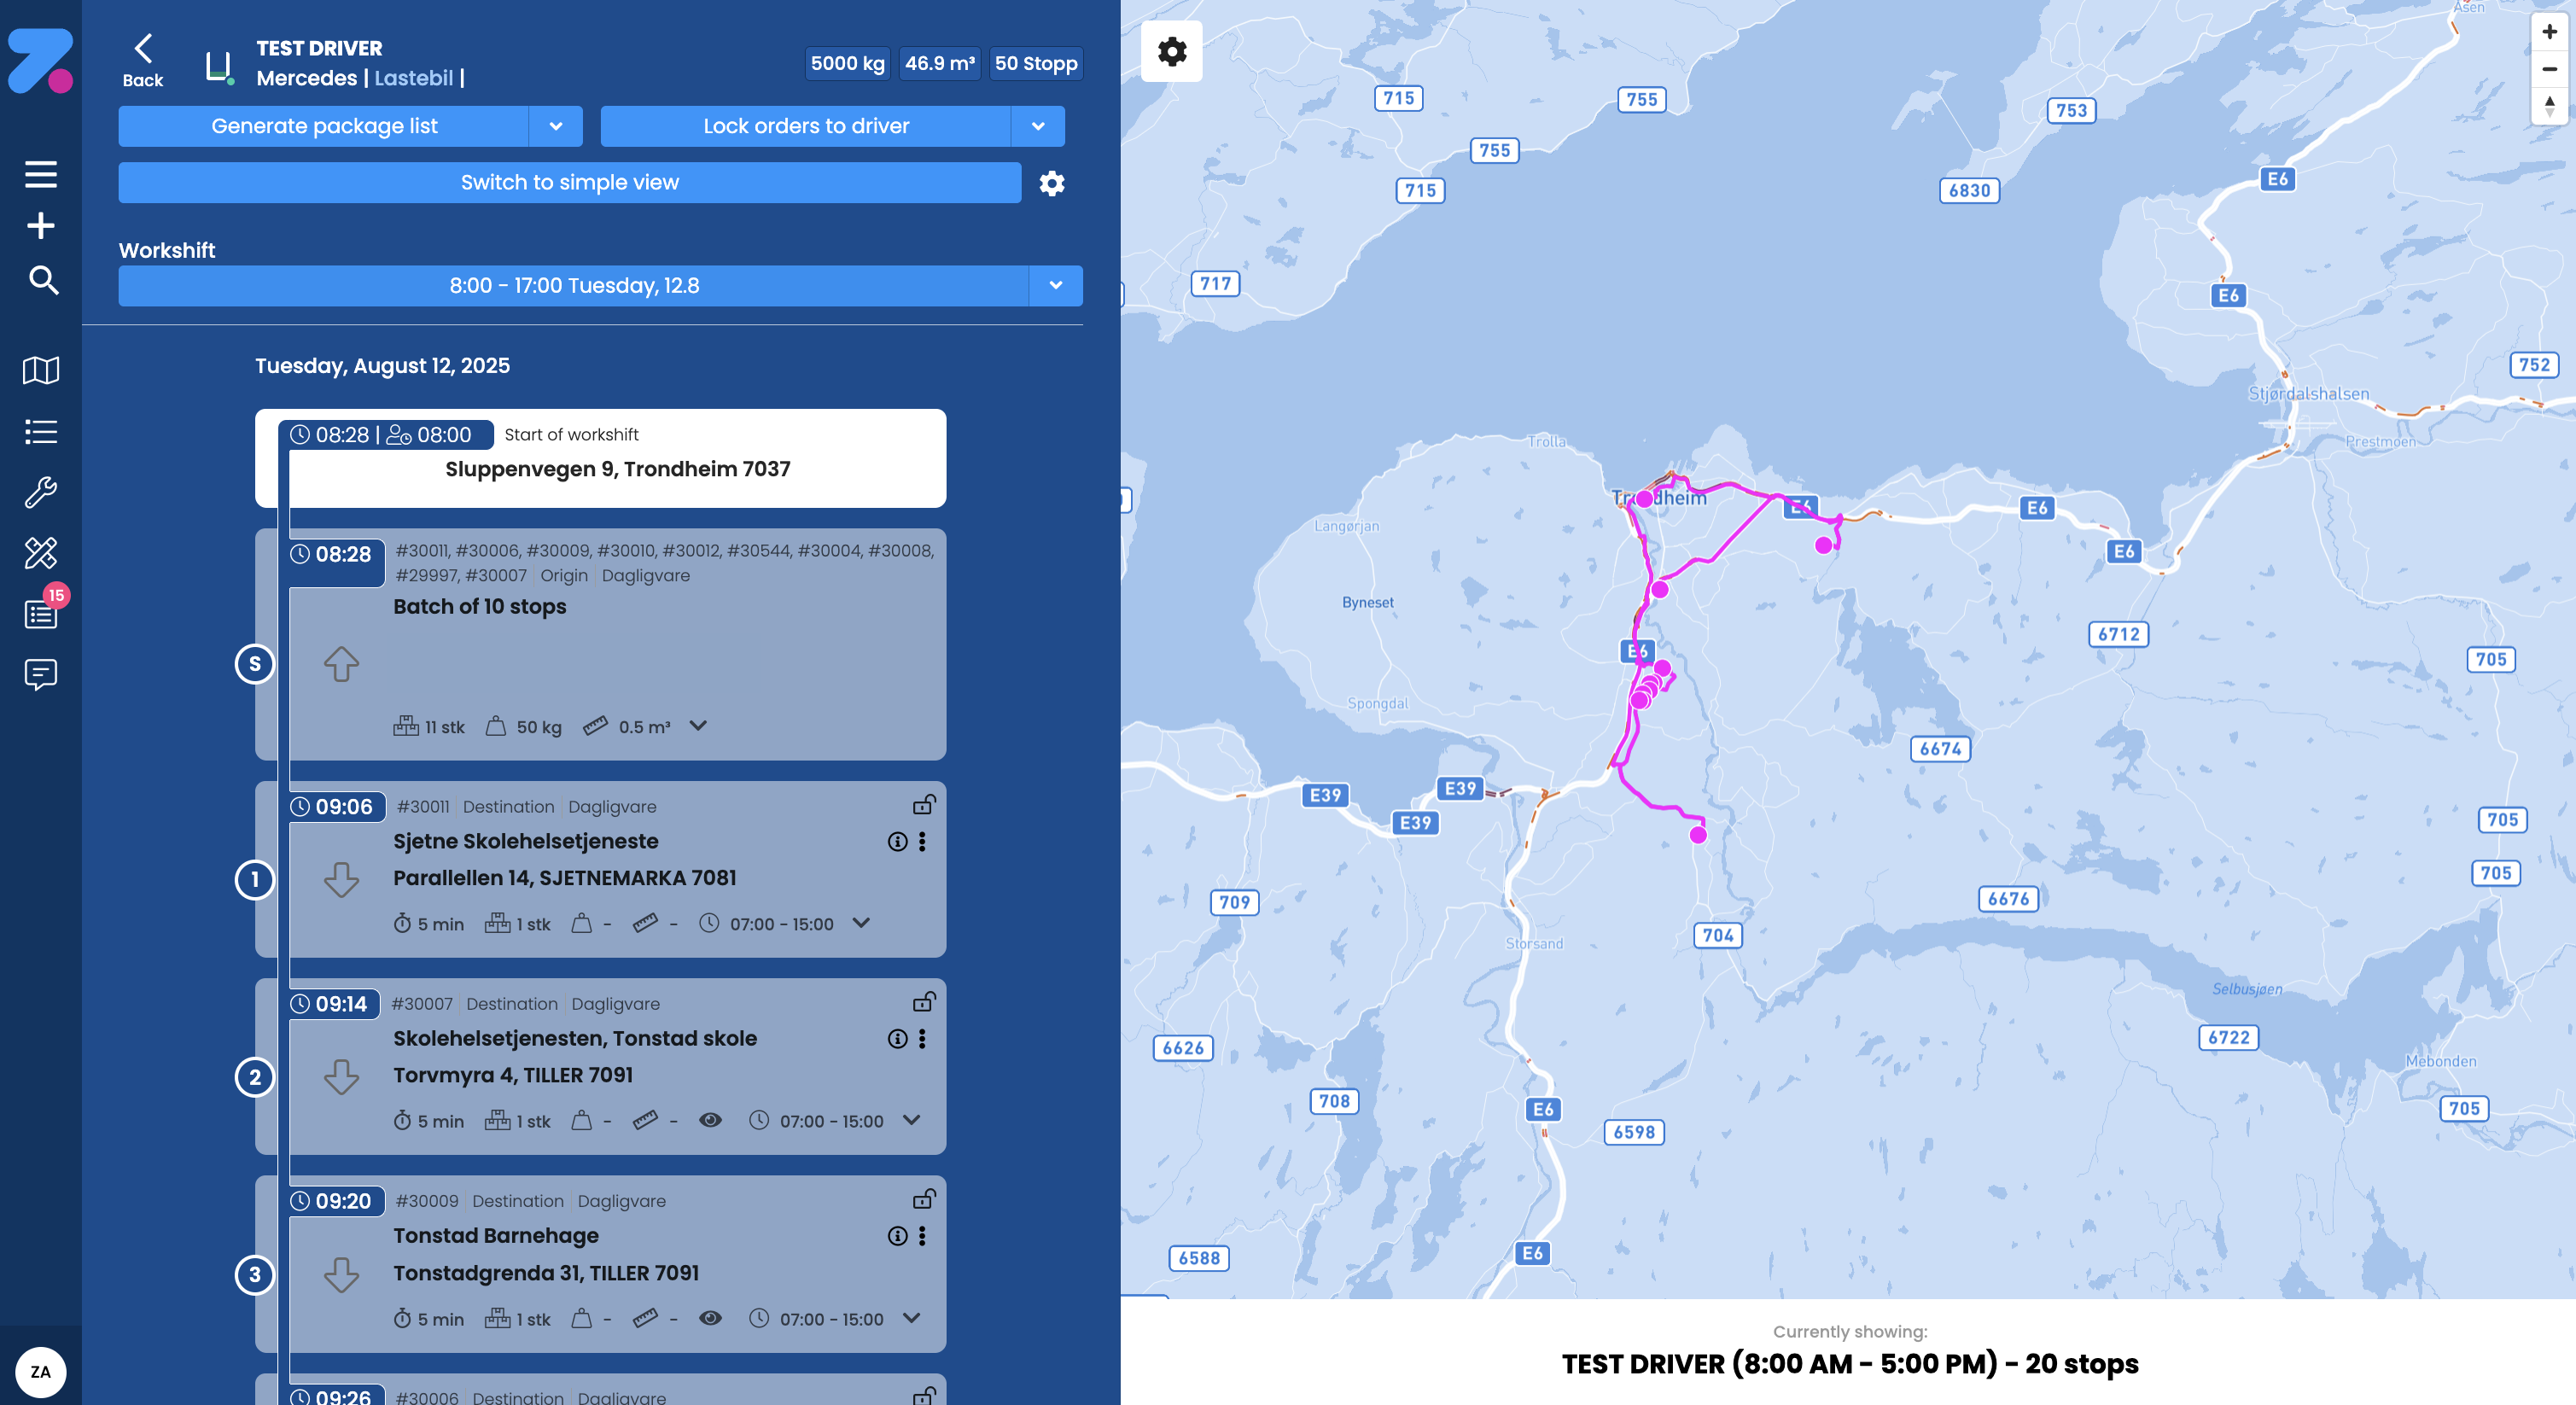
How to open the driver timeline view
Click on a driver’s name or on a work shift bar to enter the driver timeline view for that specific driver. From the driver timeline view you can dispatch the orders to that driver.
How to interact with stops
Click a stop on the Gantt chart — the map view re-centres around that stop.
Right-click a stop on the map — opens a small details popup showing:
- The stop’s time window.
- The estimated start and end time of service at the stop.
- A link to navigate to the order details.
Right-click a stop on the Gantt chart — opens a context menu adapted to what you clicked:
- On a stop — arrival/departure times, link to the order, link to the driver’s full timeline.
- On a workshift or break — edit options.
- On the end marker — estimated time of completion.
How to filter the live view
The Search and filters bar at the top of the screen accepts free text and tags. Examples:
late— match stops marked late.Acme— match orders whose customer or location name contains “Acme”.@drivers:late— built-in tag, all drivers currently late.@status:in-transit— stops currently in transit.
Filters apply across the timeline, map, and tabs at once.
How to handle a driver who’s running late
- Spot the late driver — their bar or stop turns red, and they appear under Alerts.
- Click their name to open the driver timeline.
- Decide:
- Re-optimize — let Zendera move stops automatically (button at the top of the timeline).
- Reassign a stop — right-click the stop → quick-edit → change the assigned driver.
- Push back the time window — quick-edit the stop and update its window.
- Notify the customer — open the order and share the public tracking link from the Tracking card.
How to reassign a single stop on the fly
- Find the stop on the timeline.
- Right-click it → quick-edit dialog opens.
- Change the Driver field.
- Save. The stop moves to the new driver’s row and is re-dispatched automatically.
Or drag the stop from Orders on hold straight onto a driver’s row.
How to read the bottom summary line
The footer at the bottom of the timeline shows the day at a glance:
- Completed: 4↑ and 107↓ — pickups and deliveries completed.
- Delayed to: 3↑ and 13↓ — stops that have slipped past their original window.
- Stops in total: 170 — total stops scheduled for the day.
Use this to gauge whether the day is on track without having to read every row.
What’s next
- To configure alert rules, see Settings.
- To manually override the auto-plan, see Tune routes.
- To understand what the optimizer is doing in the background, see How the system works.